Difference between revisions of "(Protocols) Field Measurement & Photography"
m (Darkwing moved page Field Measurement & Photography to (Protocols) Field Measurement & Photography without leaving a redirect) |
|
(No difference)
| |
Latest revision as of 14:31, 8 September 2022
Written by Brad Mortensen
The following is an inexpensive “how-to” for making a reliable and functional tool for obtaining accurate measurements in the field. The primary considerations when choosing or constructing a measuring device are size, weight, readability and proper photographic documentation.
Size, because large or bulky items are awkward and can be a hindrance in the field. I have had long items broken on tree limbs and brush while moving through the woods.
Weight is self-explanatory to anyone who has carried an 80 lb. pack through rough terrain. Size and weight considerations vary with location accessibility and trip duration. A day trip within a few hundred yards of a vehicle has different pack considerations than a three-day pack trip.
Readability is important in the field if you want to use your measuring device accurately and with ease. Errors can occur and it is counterproductive if you have to squint, magnify or fiddle with equipment. If it is hard to read with the naked eye, what hope is there of being able to read it on a photograph?
Photographic Documentation in the field is creating a visual record for verifying as much information as possible. Every research related action should have a photo record to go with it.
It has long been a rule of thumb that any item of standardized dimensions, such as paper money or cigarette packs, was an acceptable means of measuring tracks. It is not common knowledge that in order to obtain a semi-accurate measurement from such photographic records, you must take the photograph at a 90-degree angle from the print i.e., directly above. The item then has to be calibrated for known size and compared to the track, which often requires reproducing the item several times and in portions. One of the easiest ways to do this is to carefully cut out the item and the track. Area can also be determined this way by weighing both the item and the track on a scientific scale.
Rulers and forensic scales require the same process for track size. Due to the diversity of items being photographed, forensic size reference scales are used to accurately scale items.
Yardsticks and tape measures are slightly better than standard-size reference materials, rulers or forensic scales in that you can obtain a rough measurement directly from the photograph. The main problem with this approach is the difficulty in being able to read the measurement in the photo. A secondary problem is properly lining up the end of the track with the end of the tape measure or yardstick. Measurements can be off by one-half inch or more if one is careless in this regard. In addition, yardsticks are awkward to carry in the woods for any distance.
A track caliper is a better choice for researchers in the field. You can make these out of any number of materials, like wood, plastic or metal. Five areas crucial to creating a reliable tool are:
1. Accurate placement of measure lines. Take excessive care in getting the spacing correct.2. 90-degree angle at the stationary bar.3. 90-degree angle at the adjustable bar.4. Cut away for clear reading of measurement.5. Large clear printing of the measurement numbers.
What I will be describing is one made of tag board. Tag board, 150 lb weight paper, is available at paper, art or office supply stores. There is a limited life span on one made of this material, however it is extremely inexpensive, lightweight, very functional and useful as a basic design for those skilled enough to make one out of a more durable material.
Required materials:
- 4-inch by 22-inch strip of tag board* 3-inch by 12-inch strip of tag board* 1-1/2 inch by 10-inch strip of tag board* Small roll of drafting or artist tape (it holds but does not tear paper when removed)* Medium point black ink pen* One small paper clip
To start, fold the 4-inch by 22-inch strip of tag board in half, creasing the fold. This is so it will fit in your pack. You want to do this first to avoid distorting the measurements.
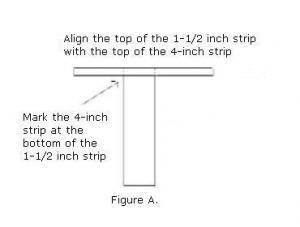
Lay the 1-1/2 inch strip on the very end of the 4-inch strip at a 90-degree angle to the 4-inch strip to form a T-shape; mark the 4-inch strip at the bottom of the 1-1/2 inch strip. This is where you will start marking your measurement lines. See Figure A.
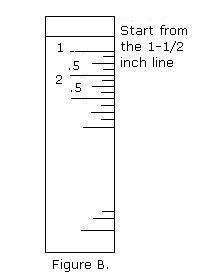
From this line make a mark every inch the full length, then go back and divide making marks every ½ inch, then ¼ inch and 1/8 inch. These lines should be staggered for ease of use. What I am describing is similar to how tapes and rulers are staggered. See Figure B. Write and mark measurements in large dark writing. This will ensure the measurements are clear in photographs.
When writing the numbers in, use decimal points and not the ½, ¼. For photo purposes, there is no need to write in the 1/8-inch numbers. The conversions are:
½ = .5¼ = .25¾ = .75
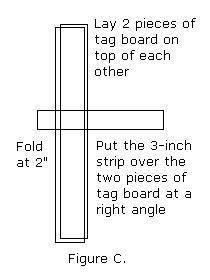
Place a double thickness of tag board under the 3-inch strip so that the sides of the two pieces are at a 90-degree angle to the 3-inch strip. See Figure C. Note that the double thickness is for construction purposes only, and is not used with the caliper. Carefully bend the 3-inch strip at approximately 2-inches from one end over the two thicknesses of tag board.
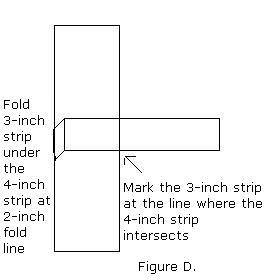
Hook the bent portion over the 4-inch piece so the 2-inch section is under the 4-inch piece and the 3-inch piece sits at a right angle to the 4-inch piece with the bulk of it over the top of the 4-inch piece to form an L-shape. Carefully mark the 3-inch piece at the edge of the 4-inch piece. See Figure D.
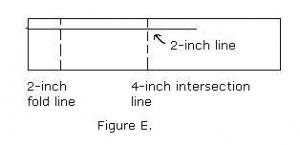
Remove the 3-inch piece and measure up 2-inches from the top; make a light line or mark. See Figure E.
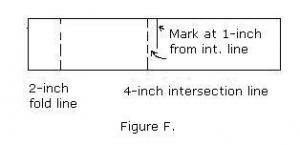
At the mark made from the intersection of the 3-inch and 4-inch measure over 1-inch. See Figure F.
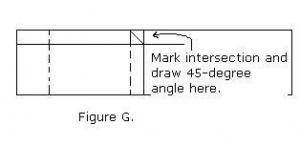
Draw a line connecting the two marks extending it past the intersection mark. From the intersecting mark, draw a 45-degree line down, away from the 4-inch piece, until it connects with the lines just drawn. See Figure G.
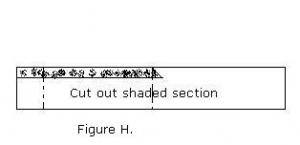
Carefully cut along the line removing the section just drawn. This piece will be the one that slides along the 4-inch measure, the cut out area allowing for easier reading. See Figure H.
Assembly of this in the field will take only a minute or two.
First, carefully attach the 1-1/2 inch piece to the 4-inch piece with the drafting tape. This is the one step where you have to use care to insure that the 1-1/2 inch piece is at a right angle to the 4-inch piece and at the correct end. Remember measuring starts at the bottom of the 1-1/2 inch piece.
Next, slip the folded portion of the 3-inch piece over the 4-inch piece. Slide the paper clip over this portion to help in loosely securing it. The paper clip may need to be spread a little so as not to bind, just not so much as to be ineffective.
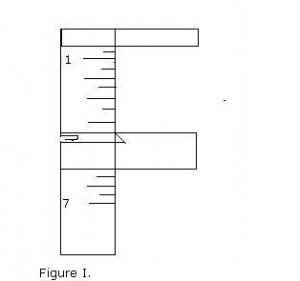
When completed it will look like a capital “F” with the lower arm movable to set measurements. See Figure I.
Always start with the caliper larger than the track so you do not damage the track while adjusting the caliper. Lay the caliper next to the track with the extended 1-1/2 inch piece very close to the top of the imprint. Slide the 3-inch piece up until it is even with the bottom of the track. The point of the 3-inch section will be at the measurement. Note this measurement in your field book and take several photographs to insure at least one good, clear photo. Good luck, we look forward to seeing your properly measured, photographed and documented finds from the field.
